3D visualization is revolutionizing industries faster than ever before. From Automotive and healthcare to architecture and retail, professionals can now render interactive models almost instantly. This new capability surpasses traditional content creation tools and changes how professionals share their ideas and designs.
The job market for skilled 3D visualization studio professionals keeps expanding in fields of all types. Industry experts say visualization artists who know advanced software like Autodesk 3ds Max and Unreal Engine are in high demand, especially in architecture, film, gaming, and product design.
Archiviz.io – What is it all about?
- Read more: Top 10 Challenges Architectural Visualization Artists Face in 2025 >>
- Archiviz.io revolutionizing the 3D Visualization industry! >>
- Archiviz.io: Revolutionizing construction 3d modeling for UK Projects >>
3D visualization has become a powerful marketing tool that boosts user involvement and conversion rates, making these skills valuable for businesses. On top of that, it improves communication between clients and creators, so everyone understands project goals and results clearly.
This piece covers the 10 essential 3D visualization skills you'll need by 2025 to stay competitive as the field evolves. We'll explore everything from basic modeling techniques to innovative real-time rendering – skills that will define your success in the visualization industry.
The article answers the following questions:
- What are the fundamental 3D modeling skills needed for visualization?
- How do texturing and shading contribute to realistic 3D visualizations?
- Which lighting techniques bring 3D scenes to life?
- What's the difference between photorealistic and real-time rendering?
- How does camera composition affect 3D visualization storytelling?
- What animation and rigging skills are valuable for 3D visualization?
- How do you effectively work with CAD and BIM data in visualization projects?
- What are the benefits of real-time 3D in visualization work?
- Which post-processing techniques enhance final visualization outputs?
- Where are 3D visualization skills most in demand across industries?
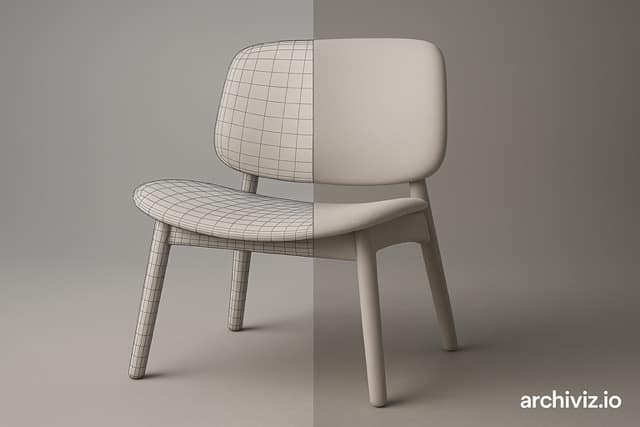
3D Modeling – The Foundation of 3D Visualisation
3D modeling is the life-blood of all visualization projects. It creates the digital skeleton that supports textures, lighting, and animations. The most photorealistic 3D visualization starts with simple geometric shapes that artists refine into detailed models. You must become skilled at modeling techniques to bring your creative vision to life, whether you're designing architectural spaces, product prototypes, or animation characters.
Interested in 3D design?
- Read more: Master 3d Interior Design Rendering – Expert Tips >>
- Interested in Interior Design?? Read more: Master Interior Design Project Management >>
- Read more: Architecture Presentation Tips: Master Your Impact >>
- Top 10 Trends in 3D Renders Architecture for 2025: How Visualization Is Transforming Design >>
3D modeling tools and techniques
3D modeling creates three-dimensional representations of objects or spaces in digital environments. The original calculations in the 1960s were primitive, but today's modeling technology delivers remarkable precision and detail. This technique splits into two main approaches: hard surface modeling and digital sculpting.
Hard surface modeling creates precisely defined geometric objects like buildings, vehicles, and product designs. Digital Sculpting works like traditional clay Sculpting and produces exceptional organic shapes such as characters and natural elements.
The industry uses several powerful software solutions with unique strengths:
- Autodesk 3ds Max: Rules the Architectural visualization market with approximately 59% usage as of 2024. It offers versatile modeling tools and excellent integration with rendering engines
- Blender: This open-source solution has grown in popularity, its user base jumped from 4% to 8% between 2022 and 2024
- SketchUp: Users love its intuitive interface and rapid prototyping capabilities. It holds 13% of the market
- Rhino: This software excels at NURBS-based modeling of curved surfaces and complex, non-linear structures
You should think about your specific use case, skill level, budget constraints, hardware capabilities, and Workflow Compatibility when choosing modeling software.
Interested in rendering and 3D visualization pricing?
- How Much Do 3d Renderings Cost? Key Pricing Factors >>
- 3D Rendering Pricing in 2025: What You Should Really Pay for a Render >>
Common modeling workflows in 3D visualization studio
Professional Studios like Archiviz.io start with concept development before modeling. The process begins by defining project scope, setting timelines, and collecting reference materials.
The modeling phase flows through these steps:
- Primitive modeling: Begin with simple shapes (cubes, spheres, cylinders)
- Refinement: Add detail and complexity through various modeling techniques
- Optimization: Keep appropriate polygon counts for rendering
- Preparation for texturing: Set up UV coordinates for texture application
Studios like ZenitVisuals combine different software—3ds Max for modeling and specialized programs for texturing and rendering. This connected pipeline moves assets smoothly while keeping visual quality high.
Visualization workflows now often split into two paths: Visualization (Viz) for visual quality and Construction & Manufacturing (C&M) for precision. Visualization artists focus on aesthetics, while Architects and engineers want Mathematical accuracy. This creates challenges when projects need both approaches.
Interested in best archiviz companies?
- Best Render Companies in the World - Ultimate Guide to Top 3D Visualization Firms >>
- Premium Architectural Visualization Services >>
- Top 10 3D Modeling Services in 2025 >>
- Studio 3D Animation: What Are The Top Studios In 2025? >>
- Looking to order 3D visualizations from one of the most affordable providers in Scandinavia? Learn more at Visu24.com >>
Wireframe modeling creates the skeletal framework of any 3D object. Artists connect lines and vertices to define edges where surfaces meet. This technique offers several key benefits:
- Designers can quickly check an object's structure without heavy processing demands
- Complex models rotate and review faster during design
- Underlying designs become clear, making structural issues easy to spot
- Traditional 2D views emerge through proper rotation and cutting planes
Wireframe models work like three-dimensional blueprints. Precise dimensions define an object's size, edges, and depth. This approach helps most during early design stages when quick changes matter more than visual polish.
Start with simple projects if you're new to 3D modeling for visualization. Learning industry-standard software through tutorials builds a strong foundation for advanced visualization skills.
Texturing and Shading – Adding Realism to Models

Image Source: Yelzkizi
Texturing turns simple 3D models into lifelike creations. The process adds surface attributes that mirror ground materials. Artists start with the modeling phase and then use texturing and shading. These techniques breathe life into flat, featureless forms and give them visual complexity and tactile qualities. A 3D model needs proper texturing to look authentic and convincing in visualization.

Are you interested in rendering? Read more:
- Expert Exterior Rendering Guide: How to Create Stunning 3D Facade Visuals >>
- Top Rendering Mistakes – How to Avoid Them? >>
- 20 Stunning Architectural Rendering Examples That Will Inspire You >>
- Expert Animation and Rendering: Pro Tips >>
- Architectural Rendering Styles: 8 Techniques You Can Use Immediately!>>
- Innovative 3d Renders Architecture Trends for 2025 >>
Texturing workflows in Substance 3D and Blender
UV mapping kicks off the texturing process. The 3D mesh gets unwrapped into a 2D projection. This vital step turns the three-dimensional surface into a flat canvas ready for detailed texture information. The artist then applies various texture maps to define surface traits like color, reflectivity, and roughness.
Adobe Substance 3D Painter leads the industry as a texturing tool built around physically based rendering (PBR) processes. Artists can paint right onto 3D models and see results immediately. Add-ons now let artists access Substance materials right inside Blender's interface, making the two programs work better together.
This approach offers several benefits:
- Artists can tweak material settings right in Blender's properties window
- Changes show up immediately without switching programs
- Artists can save custom material settings as presets
How shading impacts realism in 3D visualization
Light interaction with surfaces depends on shading, which determines how realistic the final output looks. PBR has reshaped how materials respond to light in modern 3D visualization. This creates consistent results no matter the lighting conditions.
Good shading relies on several key texture maps:
- Albedo maps show the pure color of a surface without lighting effects
- Roughness maps control how shiny or matte a surface looks (0.0 for smooth/shiny, 1.0 for rough/matte)
- Metallic maps show if something is metal (1.0) or non-metal (0.0)
- Normal maps create surface details without adding geometry
Metal textures look real because they reflect their environment based on physical properties like smoothness and reflectivity. Light interacts with these surfaces consistently in a variety of lighting scenarios. This happens as the light diffuses or concentrates reflections appropriately.
Subsurface scattering (SSS) boosts realism by showing how light moves through translucent materials like skin, wax, or leaves. Small imperfections like scratches, fingerprints, or dust make materials look more authentic. These details give them a "lived-in" feel instead of looking artificially perfect.
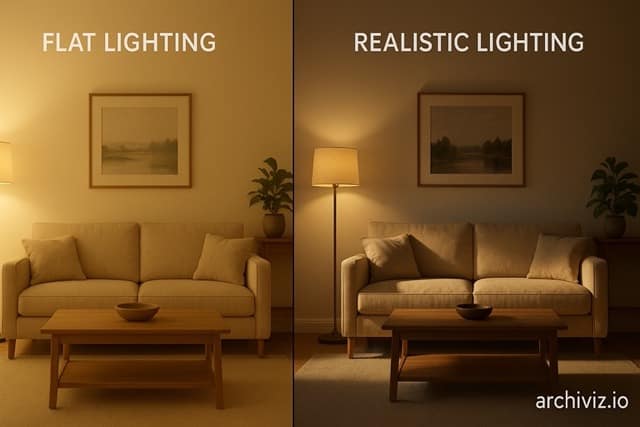
Lighting Techniques - Bringing Scenes to Life

Image Source: Chaos
Archive ABC articles:
- 3D Modeling – Everything You Need to Know About 3D Modeling >>
- Guide on 3D Architectural Rendering >>
- Rendering Software - Complete Buyer's Guide for Architects and Developers (2025) >>
Light brings 3D visualization to life and turns simple models and textures into vibrant, realistic scenes. Light acts as a visual Storyteller in 3D environments that evokes emotions and highlights features you might miss otherwise. Artists who become skilled at different lighting techniques can create atmosphere and depth while improving their work's realism.
Types of lighting in 3D visualization
Professional 3D visualization uses several key lighting types that serve different purposes:
- Directional Light: Simulates Sunlight with parallel light rays, Casting consistent shadows. Ideal for outdoor scenes, it helps establish time of day and weather conditions in architectural visualization.
- Point/Omni Light: Functions like a lightbulb, emitting light equally in all directions. Perfect for simulating light bulbs, candles, and small light sources in interior scenes.
- Spot Light: Creates a concentrated beam of light within a cone shape, ideal for highlighting specific areas or objects. Commonly used for desk lamps, reading lights, and dramatic emphasis.
- Area Light: Emits light from a flat surface (rectangular or circular), creating soft, diffused lighting with natural-looking shadows. Excellent for simulating windows, skylights, and softboxes.
- Ambient Light: Provides overall, non-directional illumination that fills the entire scene. Essential for creating balanced lighting and avoiding overly dark areas.
- HDRI Lighting: Uses high dynamic range images to create realistic environmental lighting and reflections, capturing a wide range of luminance levels.
Professional 3D visualization Studios employ advanced lighting techniques like global illumination. This calculates how light bounces between surfaces to create natural ambient lighting throughout a scene.
Lighting Setups for Architectural and product renderings
Three-point lighting creates the foundation for most professional lighting setups, especially in product visualization:
- Key Light: The primary light source provides dominant illumination at a 45-degree angle from the subject.
- Fill Light: Opposite to the key light, it softens and fills shadows while controlling contrast without overwhelming the scene.
- Back Light: Behind the subject, it creates a subtle outline that separates it from the background and adds dimension.
Architectural visualization looks most realistic when natural and artificial lighting work together. Natural light adds softness through windows and openings, while artificial light brings warmth and emphasis to specific architectural elements.
Rendering – From Model to Masterpiece
The final images, animations, and interactive experiences that clients and audiences see come from rendering. This process takes all previous 3D visualization work and calculates how modeling, texturing, and lighting elements work together to create the final visual output.
Photorealistic vs. real-time rendering
Photorealistic and real-time rendering are two different ways to create 3D visualization outputs. Each brings its own advantages:
| Photorealistic Rendering | Real-time Rendering |
|---|---|
| Pre-calculated offline process | Generates images instantaneously |
| Highest level of detail and realism | Prioritizes speed and interactivity |
| Uses advanced global illumination | Relies on Optimization techniques |
| Calculation time: minutes to hours | Renders at 30-60+ frames per second |
| Ideal for: marketing materials, static images | Ideal for: interactive walkthroughs, VR/AR |
Photorealistic rendering creates exceptionally accurate representations of materials, shadows, and reflections through careful light calculations. Real-time rendering lets users interact with the environment right away. They can move through spaces and trigger effects without waiting for renders to finish.
Real-time rendering used to sacrifice visual quality for speed. Now, this gap gets smaller thanks to advanced technologies like NVIDIA's RTX products. These products come with dedicated ray tracing cores that speed up the rendering process.
Rendering engines used in 3D visualization studio
3D visualization Studios use different rendering engines based on what each project needs:
V-Ray leads the industry in photorealistic rendering, especially for architectural visualization. It uses NVIDIA OptiX technology to scale across multiple GPUs and has AI-accelerated denoising that removes image noise.
Corona Renderer excels in high-end Architectural visualization with minimal setup needed. It delivers physically plausible results with realistic lighting and materials. Most people learn to use Corona in just one day.
Unreal Engine creates incredible photo-realistic experiences in real-time with advanced ray-tracing. Game Developers created it first, but now Architects use it for visualization and interactive product demos.
Unity matches these real-time rendering capabilities and works great across platforms. Architects and 3D artists can turn Revit models into immersive experiences with a single click, thanks to Unity's seamless integration with Autodesk products.
Camera Composition – Framing the Perfect Shot

Image Source: Chaos
Camera composition acts as your window into the 3D world. The way you position and use cameras shapes how audiences connect with visualized spaces and objects. Your best 3D models with perfect texturing, lighting, and rendering won't shine without the right camera work. Becoming skilled at camera composition in 3D visualization helps you frame your creations to tell compelling visual stories.
Camera Angles and lenses in 3D visualization
Smart camera placement breathes life into rendered projects and revolutionizes perspective in 3D visualization. Eye-level shots, also known as Hero shots, let viewers connect directly with the space. These shots work great for interior walkthroughs and dialogue scenes.
Higher Angles give viewers both property and surrounding area views while keeping the details clear. Low-angle shots make subjects look larger and more powerful, which suits Architectural exteriors that need to show grandeur.
Your lens choice shapes the visual impact:
- Wide-angle lenses (24-28mm) with 90-100° FOV show entire rooms but may distort
- Standard lenses (35-60mm) give the most natural perspective matching human vision
- Telephoto lenses compress space and highlight specific details while flattening perspective
Most professional 3D visualization studios place interior cameras at 4'6″-5'0″ height with wider lenses. This setup matches human perspective and addresses accessibility needs found in 32% of projects.
How composition affects Storytelling
Composition rules lead viewers through visual narratives and create emotional responses that focus attention on key elements. The rule of thirds splits the frame into a 3×3 grid. Placing important elements along these lines or at intersections creates balanced, dynamic compositions. This technique makes renders more engaging and pleasing to the eye.
Corner views show two walls at once, creating better depth perception and a sense of space that frontal views can't match. Three-quarter Angles of exteriors get 27% more engaging than frontal views. Diagonal compositions keep the viewer's attention 18% longer than centered arrangements.
Your camera becomes another character in the scene. It hesitates, moves closer to study details, or pulls back to display magnitude. Camera placement should match what you want to emphasize and the feeling you aim to convey.
Great 3D visualization balances three elements: Architectural accuracy with correct proportions, emotional appeal through human-scale perspectives, and commercial impact via strategic feature highlighting.
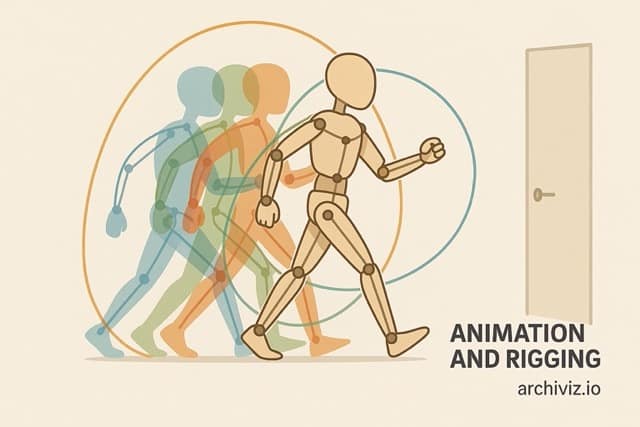
Animation and Rigging – Adding Motion to Visuals

Image Source: YouTube
Static 3D models come alive through motion. Animation and rigging are crucial skills that create dynamic visualizations. Storytelling in 3D visualization becomes possible when you know how to animate objects and characters in ways Static images can't match. Simple movements in product Demos and Immersive Architectural walkthroughs raise the effect of any visualization project.
Interested in Drone Photography?
- Drone photography for real estate: Stunning Aerial Views >>
- Drone Photography UK – What It Costs in 2025 & How to Book Smarter >>
Basics of rigging and keyframe animation
Digital Skeletons control how objects move, and they are the Foundations of 3D animation. These Skeletons use interconnected joints and bones that set movement points for the model. A rig works like a chain of object relationships that lets animators create realistic model movements.
The rigging process works through these steps:
- Creating the skeletal structure with properly placed joints
- Skinning (attaching the 3D model to the skeleton)
- Weight painting (defining how much influence each bone has on different parts of the model)
- Adding controllers to simplify the animation process
Keyframing serves as the most basic animation technique after rigging. Animators set poses at specific frames, and the software creates movement between these points. This gives exact control over timing and movement quality that works best for detailed character animation where every gesture counts.
Two important animation concepts include:
| Forward Kinematics (FK) | Inverse Kinematics (IK) |
|---|---|
| Animator controls each bone individually | The software calculates joint positions automatically |
| Better for precise, controlled movements | Ideal for natural, goal-oriented movements |
| Follows hierarchical relationships | Simplifies animation of limbs and extremities |
| More time-consuming for complex motions | Makes walking animations more efficient |
Use cases in product Demos and Architectural walkthroughs
Animation makes product demonstrations powerful by showing functionality, moving parts, and assembly processes. A 3D visualization studio like Archiviz.io can show a product's internal mechanisms in action, highlighting key features through coordinated movement and camera angles.
Architectural visualization becomes an immersive experience through animation. Rigged elements like opening doors, moving escalators, and animated people make Architectural walkthroughs feel real and show true scale. These animated elements help viewers see how spaces work together and flow, showing context that static renderings miss.
Interested in 3D services?
- What Is Virtual Tour – Everything You Need to Know for 2025 >>
- Stunning Interior Design Portfolio Examples >>
- Elevate UK Design with Architectural Visualization 3D >>
- Virtual Property Tours: Revolutionizing UK Real Estate >>
- Check Archiviz.io's Renderings and 3D-Visualization services here! >>
Conclusion: Take the Next Step in Your 3D Visualization Journey
Mastering these ten essential 3D visualization skills will set you apart in a competitive and fast-moving industry. Whether you're working in architecture, product design, gaming, or virtual experiences, building a solid foundation in modeling, lighting, rendering, and real-time techniques ensures your work is both technically precise and visually compelling.
To explore how top professionals apply these skills in real client projects—and to discover tools, workflows, and artist-friendly platforms that can elevate your work—visit Archiviz.io. Our platform connects skilled 3D artists with clients across industries and offers valuable resources, visual inspiration, and project support to help you grow as a visualization expert.
Read more why to buy 3D services: